5 Essential Calisthenics Moves for Beginners
Start your calisthenics journey with this ultimate beginner’s guide—learn the five essential moves that build strength, control, and mobility to set you up for every skill ahead.

Simao Esteves

Introduction
As a beginner who either heard of Calisthenics online or through a friend, there are a couple of essential moves which mastered help laying the foundation for harder, more complex elements later on in the journey. These elements help building the foundation, which when strong and solid make everything a lot easier – avoiding injuries, stagnation, and frustration.
If we enumerate them, these would be: (1) progressive overload, (2) basics, (3) core, (4) balance, and (5) flexibility-mobility. Lucky for you (the reader), these are not only concepts to grasp, but also to understand, and explore throughout your entire journey.
In this short-manual, the intention is to open your horizons. Not to go too deep into each concept but to provide you with the essential information from which you can then research deeper.
So, let’s get into it!
Progressive Overload
If you are a “fitness guru”, you have most likely heard about progressive overload quite a bit and maybe you already know. However, if you do not, let’s dig into it.
What does it mean?
Progressive overload stands for a continuous process of development, challenge, tracking, awareness, rest, nutrition, and self-care. It’s the action of challenging your body in an exercise (or group of exercises) in a continuous manner (session to session, week-by-week, month-by-month) to grow stronger, faster, more skilled by raising the difficulty of the workouts and/or the exercises performed. Achieving your personal aims along the way, that you set at the beginning and conquering the goals to achieve those aims.
It’s a tool, which if used correctly, your progress is simply going to be “nuts”. This because, your body responds to stress. Give it a little, and it will change accordingly. Give it too much and it may break, or take too long to recover from. Knowing the correct quantity is the key – having someone to guide you who has previous experience is a short-cut (in general), but figuring it out on your own is also part of the journey (just listen to your body and make adjustments accordingly).
How to progressively overload?
The method has its rules, follow them and/or have a play, and progress is yours. These are:
1) Increase the number of sets.
2) Increase the number of repetitions [reps] or time-under-tension [TUT]. Whichever comes easier for you, and then increase the other one. They have an inverse relation. That means that when one increases, the other decreases. Managing this relationship correctly is what brings you good progress. One way for example, you began at 5 sets for 3 reps of pull ups. You increased to 5 sets for 5 reps, but cannot perform the 6th pull up. Now, you can build up TUT at the top/mid/bottom of the pull up on the last repetition. On the 5th rep of each set, you hold 3s at the top, mid and then bottom. Gradually increasing the hold duration to 5, 8, 10s and then the 6th pull up arrives. Another way of applying TUT is to focus on the weakest sections of the exercise and strengthen these ranges of motion [ROM].
3) Increase the difficulty by adding weight or changing progression, or decrease the assistance. Increments essentially, adding 0.25-5kg to the exercise or placing the elastic band in a different position (in terms of levers: from the feet to the knees, knees to below the butt, from below the butt to above the butt, from above the butt to a lighter band to eventually to no band) or going from a pull up to an explosive pull up, etc.
You start by modifying the number of sets, followed by the number of reps or TUT, and lastly, you modify the exercise difficulty (the progression). You should also be aware of the following chart:
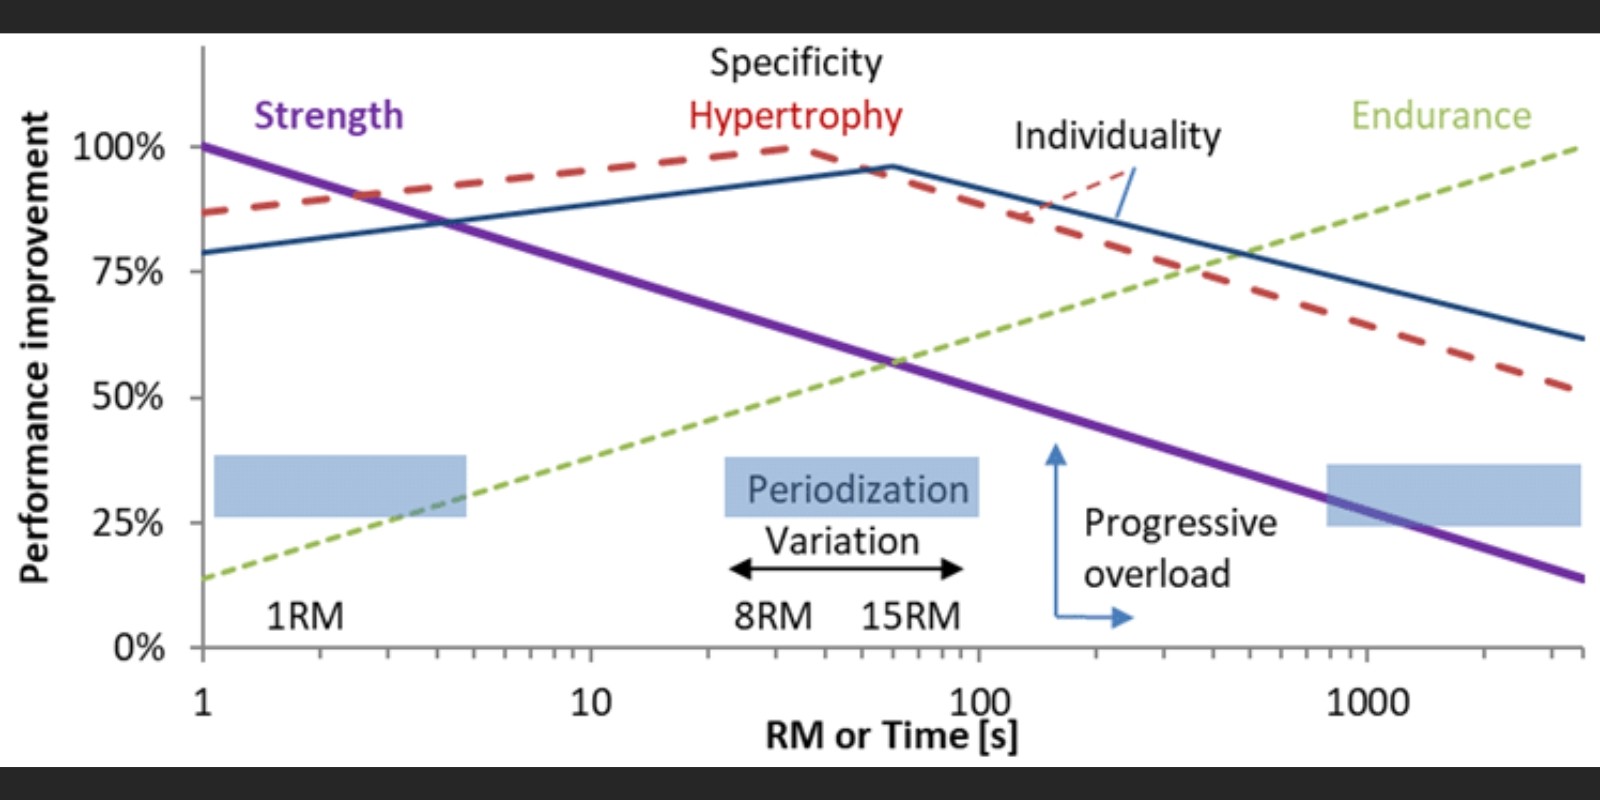
Figure 1 - Strength, Hypertrophy, Endurance ranges Relationship
It clearly shows the relation between the ranges of Strength, Hypertrophy, and Endurance. As you can see, each range there is a cross-over. Meaning when working on strength ranges, you are getting hypertrophy too. When peaking the range for hypertrophy, strength development is reduced and endurance development is increased. Whereas on endurance ranges, little strength development happens as hypertrophy too. These are a guide; another concept is volume – the number of sets multiplied by the number of reps or TUT.
Peaks of each category: | Repetitions | Isometrics (time under-tension) | Notes: |
|---|---|---|---|
Power/Strength | 1-6RM | 0.5s – 5s | Muscle failure due to high load, high intensity (100-80%) |
Hypertrophy | 8-15RM | 10-30s | Moderate intensity (80-60%) |
Endurance | 20RM+ | 45s+ | Lower intensity (60- 20%) |
As you become stronger, what was once a 1 rep max [RM], it now becomes 3RM…5RM…10RM…etc, and increasing the load is necessary to keep good progress and avoid stagnation.
It’s of good practice to not always workout near your 1RM as it’s too taxing for the body, nor on 20RM+ either.
Having a balance between all ranges or at least 2 of them is of good practice to keep progressing.
Specifics come down to your aims & goals, training, sport, fitness level and athlete’s history. For example, a beginner’s workout is far different to an elite athlete – the first is yet learning the movement patterns, and the other is a veteran who already knows what works best for them.
Basics
These entail the fundamental elements of Calisthenics: rows & push ups, pull/chinups & dips, squats, and eventually skin-the-cats.
Rows & Push Ups
Horizontal movements which are the primary motions you must learn in Calisthenics (Figure 2 & Figure 3). Just like a mirror, each is an antagonist (counterpart) of the other element. They lay down the foundation for the next step – the pull/chin-up and dip.
Proper execution
Beginning with straight arms (elbows completely locked out), you bend the elbows while keeping the body straight (like a wood plank – feet, hips and chest/shoulders aligned) till you reach the floor or bar (or rings) with your chest. And do the reverse to complete the motion, that’s 1 rep.
Regarding the push up (Figure 2), you begin in a plank (pelvic tilt*) with scapula protraction*. As you go down (elbows bend [2]), you may lose this initial position (completely fine) however, once you complete the repetition and are at the top again, reset this scapula protraction [1]. Then, you can initialise the 2nd rep and any subsequent repetition.
*Pelvic tilt - highly important, do not stick your butt out nor let it loose and drop in (somewhere in the middle, there’s a hip rotation inwards). This pelvic tilt allows you to engage your core which is of utmost importance to keep stability in your lower back and spine, energy efficient, connection between your torso and lower limbs, control and safety of execution.
*Scapula protraction - imagine rounding your upper back, bringing your shoulders in front of the chest, and squeezing a pen between your chest. Keep the shoulders down (called “shoulder depression”) away from the ears.
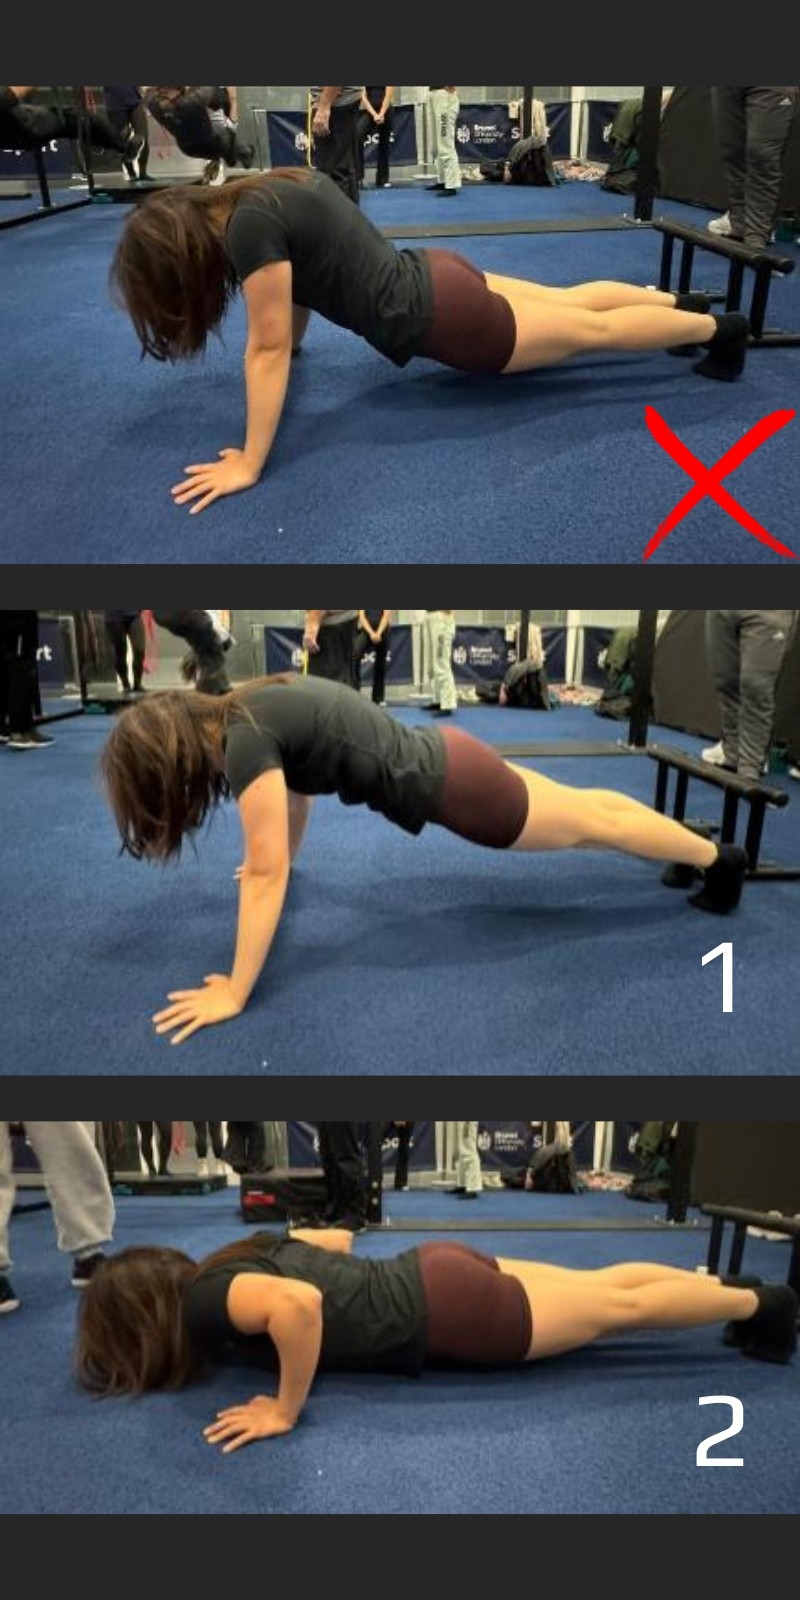
Figure 2 - Push up with proper execution
Regarding the row (Figure 3), you begin in a reverse plank (likely at an angle initially and not with your body parallel to the ground) with scapula retraction*. As you go up (elbows bend), you retain this position throughout the entirety of the movement (contrary to the push up). Once you complete the repetition (chest to the bar/ring [2] and back to initial position with straight arms [1]), you can initialise the 2nd rep or any subsequent repetition.
*Scapula retraction – bring your shoulder blades together, as if squeezing a pen behind your back. Bring the shoulders down (away from the ears – maintains the shoulders inside their socket), and open the chest.
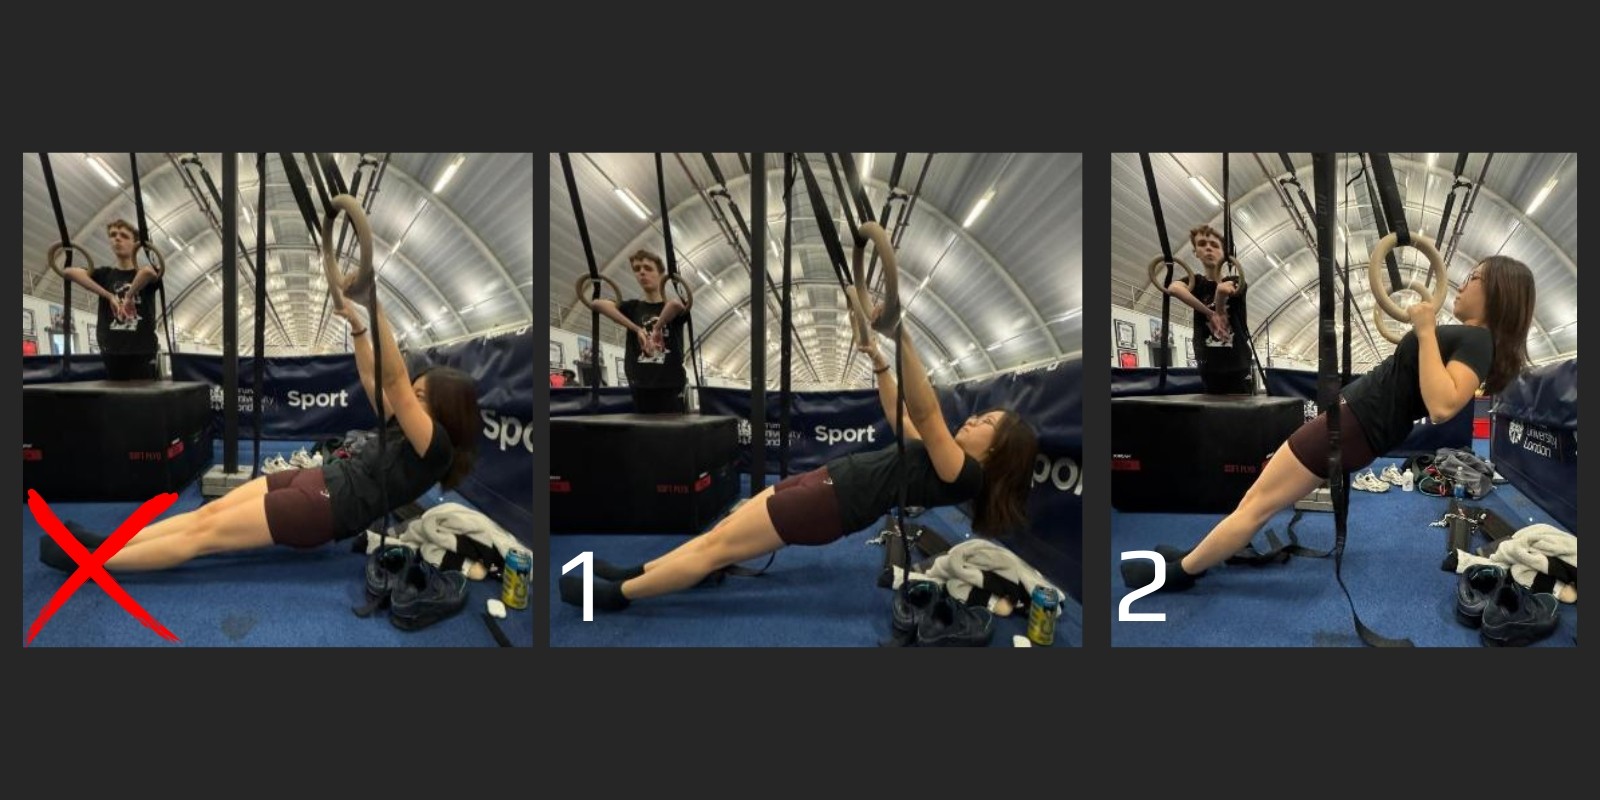
Figure 3 - Row with proper execution on rings
Pull/Chin-ups & Dips
Both these movements, may seem pretty straight forward. However, the form execution, speed, power between a beginner and pro are quite different.
On the one hand, the pro has mastered the movement; they know the ins and outs of it and how to be efficient with the execution to avoid sloppiness and keep them clean from start to finish (Figure 4 & Figure 5).
On the other hand, the beginner forgets to:
(1) lockout the arms at the bottom (pull ups) or top (dips);
(2) pull all the way up till their chin is over the bar and their collar bones are nearly levelled with the bar; whereas on the dips, bending their elbows past 90d. angle (shoulder just below elbow);
(3) maintain the body tight and rigid (“one unit”) without crossing the feet – just keeping them together;
(4) on the pull/chin-ups, the beginning of the motion begins through an active hang followed up by the bending of the arms;
(5) on the dips, the body never arches back on the way up despite fatigue – there’s a clear body alignment (chest, hips, knees, feet), even if the knees are bent backwards
Lastly, the difference between pull ups and chin-ups is just the hand grip. Chin-ups you execute the motion with the palm of your hands facing you (called “supination”), whereas on a pull up the back of your hand faces you (called “pronation”).
Below, Figure 4, you can see the key points of a properly executed pull up: [1] dead hang – initial position, usually used to rest; [2] active hang – first motion to initialise the pull, it can be kept for subsequent reps without having to go through [1] again; [3] midpoint of the pull; [4] top of the pull up – here a lot of people struggle to bring the chin over the bar, work on it separately if needed.
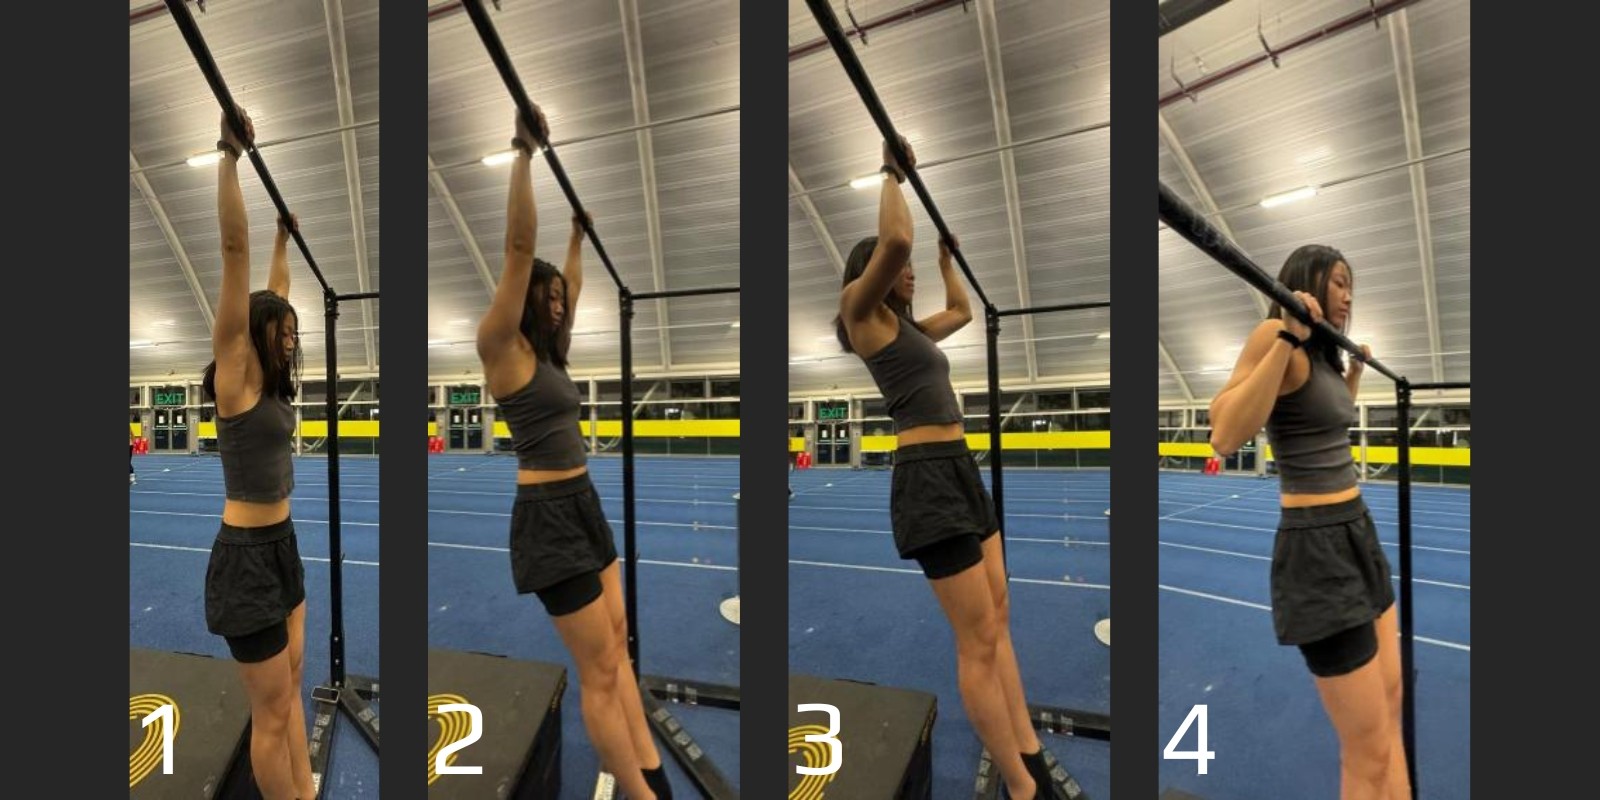
Figure 4 - Pull up with proper execution
In Figure 5, the beginning of the dip starts in [1] with shoulder depression and the body straight; as you bend the elbows and go down, you hit position in [2] where key points are that the shoulder is below the elbow (below 90d. bend) and the hips are under the bar. Then you return to position [1]. Regarding position [3], you can execute them if you have the mobility which allows you to do so – totally safe if such is developed progressively, simply gives you more room for gains due to the bigger pec stretch.
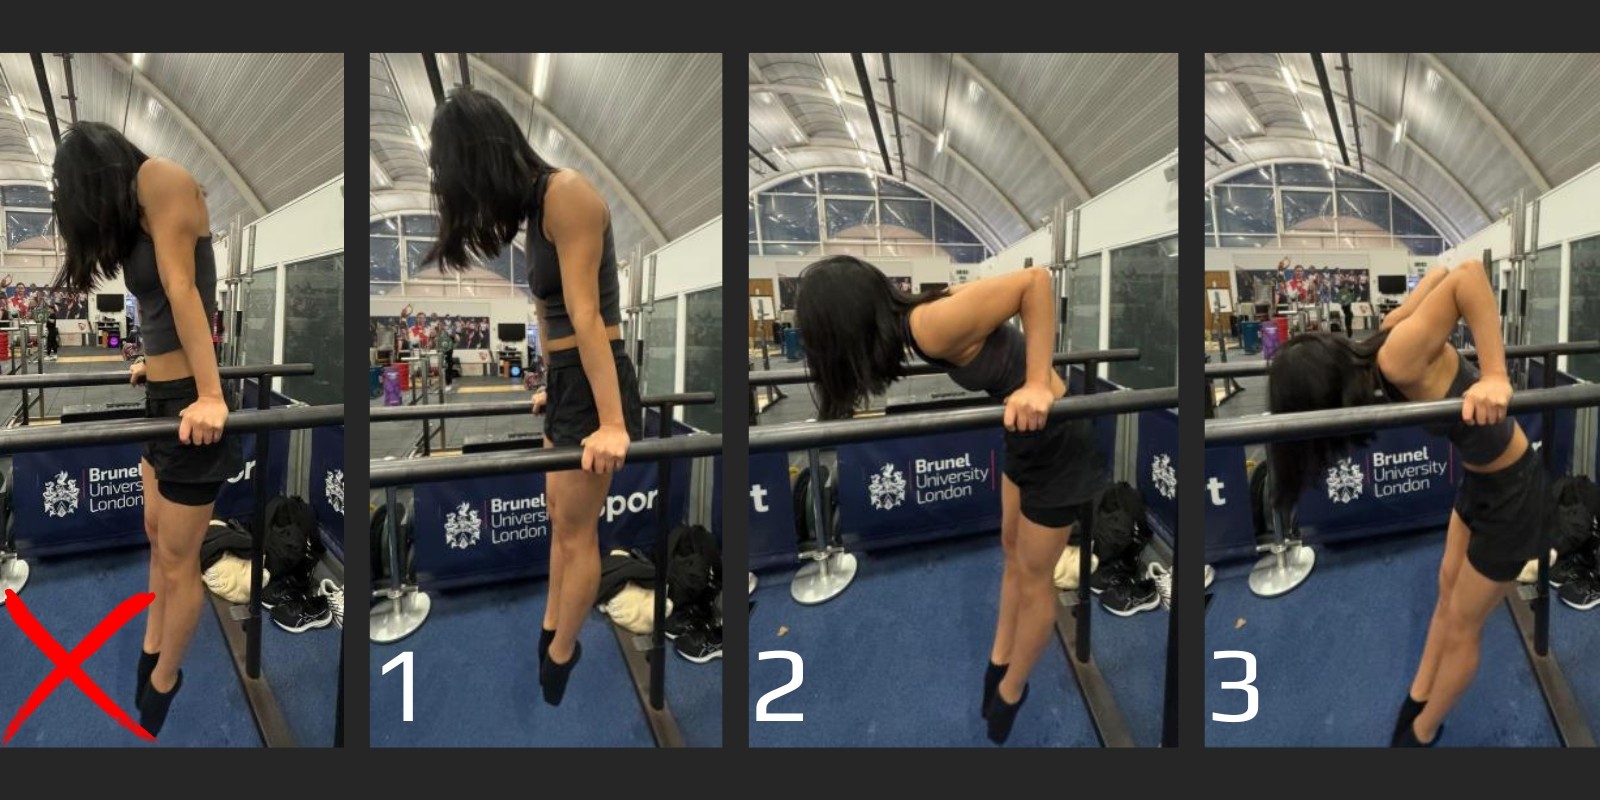
Figure 5 - Dip with proper execution
Squats
A simple bodyweight movement which most people may not be able to properly execute, at least not going all the way down without falling backwards. That is because they have tight ankles. How to fix that? Stretch your calves. Be able to get your knee past your toes, the further you can do that, the lower you can get without trouble. The misconception of your “knees past your toes is bad for you” has been debunked long ago.
Build to free weights, learn to bail if you get stuck under the weight, learn the front and back squat, deadlifts, pistol squats, and if you want to get adventurous, learn Olympic weightlifting where they will teach you the snatch and the clean & jerk. Learn proper execution and common mistakes. If you don’t have a good coach, I recommend looking into the professional Olympic weightlifter’s videos to get some cues on the execution of the movements (especially, Chinese athletes – they LIVE and BREATHE those movements). But as always, try to get some professional help initially (at least), it makes your life easier.
In Figure 6, are examples of calf stretches positions which you can work on in your warm-up prior to your leg session. Suggestions are to do between 60-90s each position [1], [2] and [3] once while actively pulling your toes towards you. Although, keep your 1 2 3 working foot on a height challenging enough to bring your heel to the ground as a measuring system – instead of a tall box just like in the figure. In position [4], it can be both used as progress measurement (how far can you bend your knee without lifting the heel off the ground) & stretching position.

Figure 6 - Calf stretches at 3 angles
Skin-the-Cats
These are a special addition to the mix. The only reason I decided to mention them is because they are the perfect introduction to straight arm movements and levers (Figure 7). Once you are able to do dips and pull ups, the skin-the-cats are the next best thing to practice.
In Figure 7, start in a hanging position – active hang; [1] tuck your knees to your chest (the closer to your chest the easier); [2] roll and elevate your hips – front-lever; [3] keep turning – upside down; [4] till your arms are behind your back – back-lever; [4] try to hit the German-hang position and from there go back to the beginning. Now, initially, a little help may be required to go over – a kick to build momentum, or someone spotting you.
Develop to maintain your elbows always locked out. Understand the movement, achieve full ROM. Increase the reps, and when strong enough (you will know), you can play with extending your knees further away from the chest to increase the difficulty (progressive overload remember?).
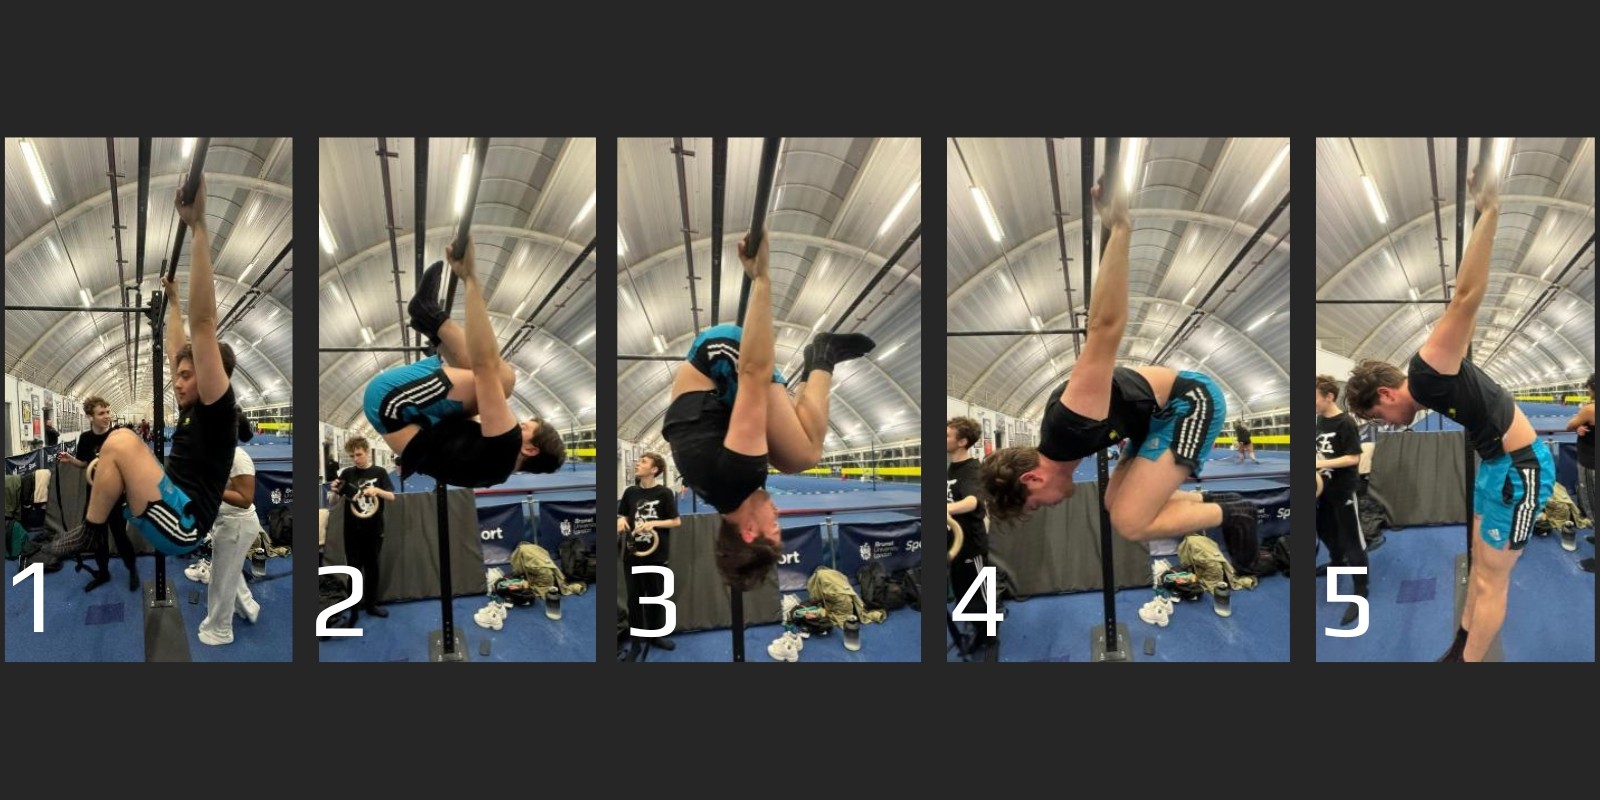
Figure 7 - Skin-the-Cat tuck version example of proper execution
Core
It’s not only about having a 6-pack. There’s far more to it. It’s your whole abdominal area – the front (abdominals, and diaphragm), the sides (obliques) and from behind (lower back, hips and glutes) and inside (the pelvic floor). To make things easy, these can be worked together (they usually are if with the correct activations & engagement) and in isolation – to an extent.
As you may know, your core is used for rotation, stability, flexion, and extension – not always necessarily doing one motion at a time, but sometimes doing a complex of them. Now, how to work on it? Doing exactly that. Now, I am not going to state every single exercise you can do, but I am going to mention those which I believe are the fundamentals to then develop every other from.
Essentials for Calisthenics:
Plank
The base of the base, any harder couldn’t be. It can be executed on your elbows or hands. Legs together with straight knees. You can protract your scapula or keep it neutral – just don’t let your chest sink in to the floor [in red]. Key components to look at: (1) the pelvic tilt – this is THE MOST IMPORTANT. It allows you to engage your core muscles correctly, protecting your lower back and spine from all the pressure from gravity. It also allows to keep your body straight and aligned when doing push ups and other pushing movement (Figure 2).

Figure 8 - Plank with proper execution
To understand the position correctly, stand-up with your back against the wall (Figure 9); bend your knees slightly; now, move your pelvis until your WHOLE lower back is touching the wall; keep it there, that’s your pelvic tilt. Make sure to really understand this motion, feel the muscles engaging.

Figure 9 - Pelvic tilt understanding on wall, drill
B. Reverse plank
The opposite to the plank (Figure 8), on elbows or on hands (elbows locked out, hands with fingers facing forward or fingers facing back or sideways, whichever you prefer). Open the chest, retract your shoulder blades (explained before in Rows & Push Ups), and push your hips ups – maintains the alignment (chest, hips, knees, feet). When done correctly, you should not be able to see your feet, only your chest and hips.
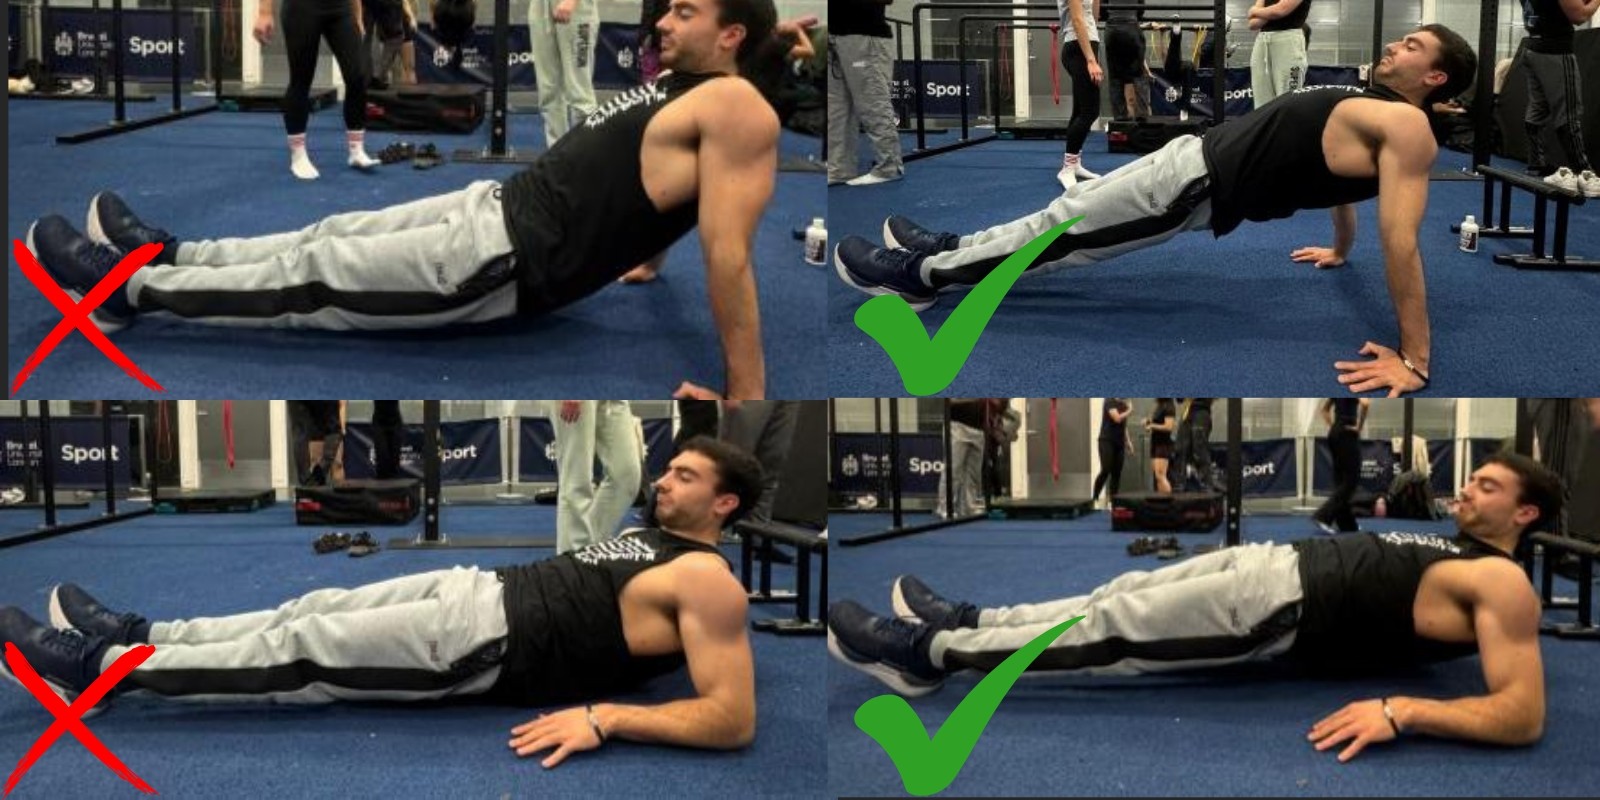
Figure 10 - Reverse plank with proper execution
C. Side Planks
Executed on one hand or elbow and leg or both legs if crossed. Make sure to push your hips high, keep the non-working arm resting alongside the body or straight up as in Figure 11.
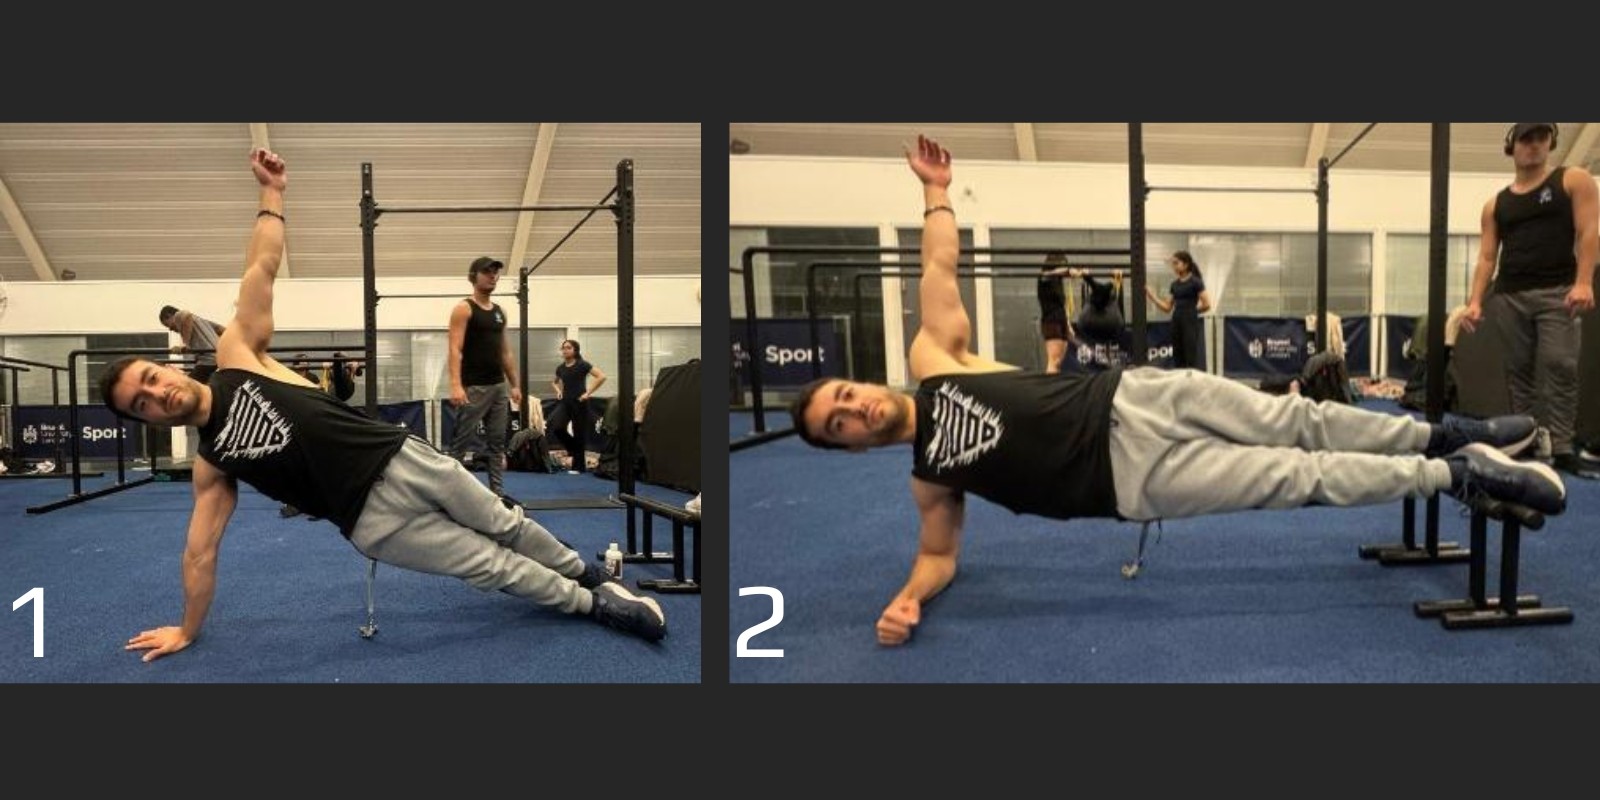
Figure 11 - Side plank with proper execution
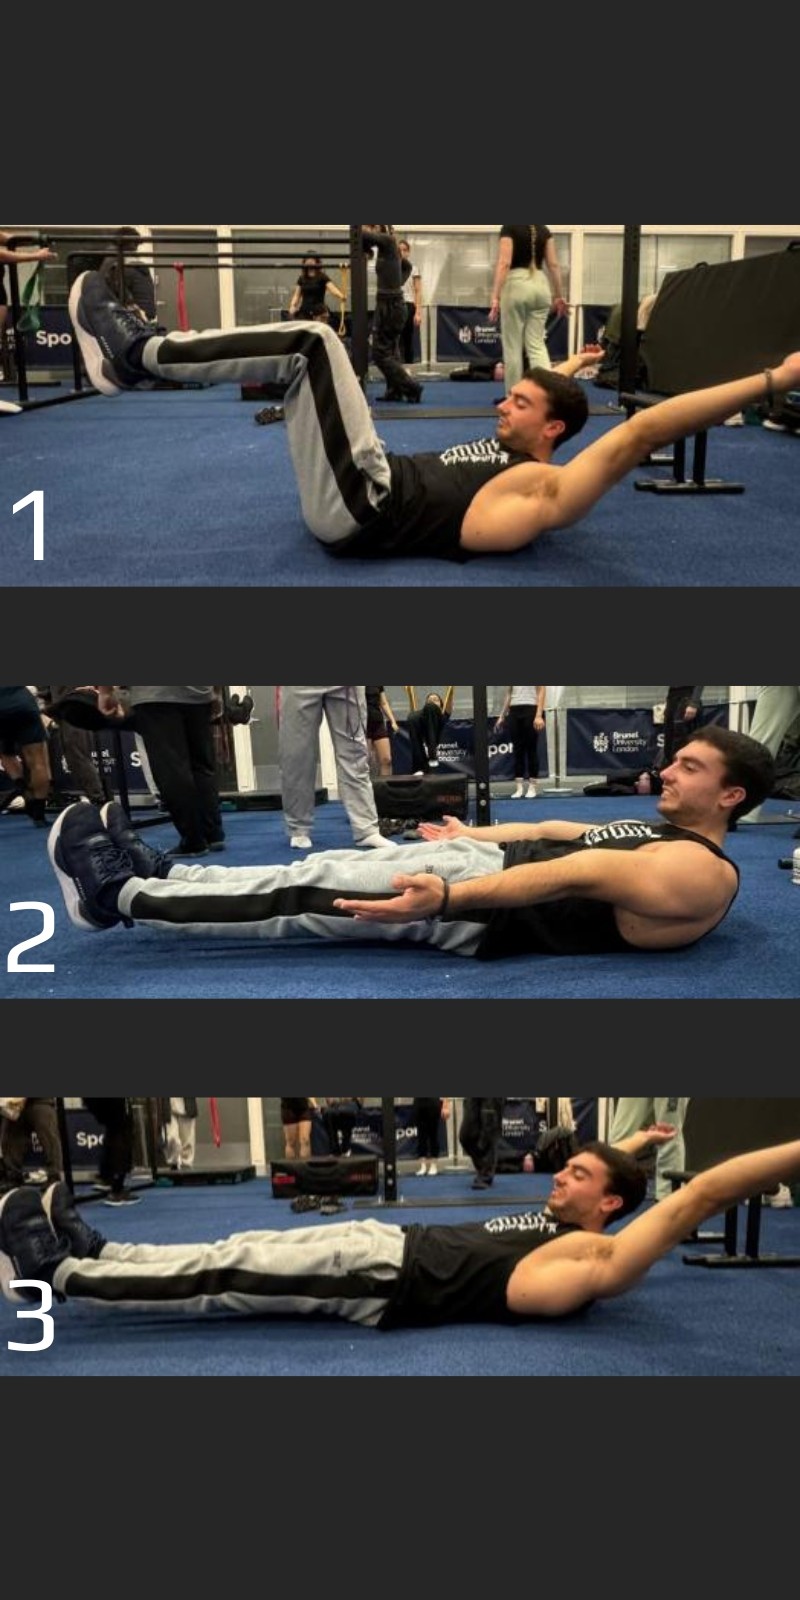
D. Hollow Body
Back to the ground & belly to the ceiling, your aim is to keep your shoulder blades (upper back) off the floor and feet, only the lower back should be touching the floor (pelvic tilt). Suck your stomach in, and bring your arms either to the side your body [2] (easier) or above your head [3] (harder). Initially, you may not be able to do it with complete straight legs, simply start with them at 90d. [1], increase TUT and progress accordingly till you have legs completely straight without losing your pelvic tilt at all times (even if your knees are bent).
E. Reverse hollow body position or “boat”
Belly and chest to the ground, lift your whole torso off the floor and legs, only your belly should be on the floor. Arms either alongside your body (easier) or above your head (shown - harder).
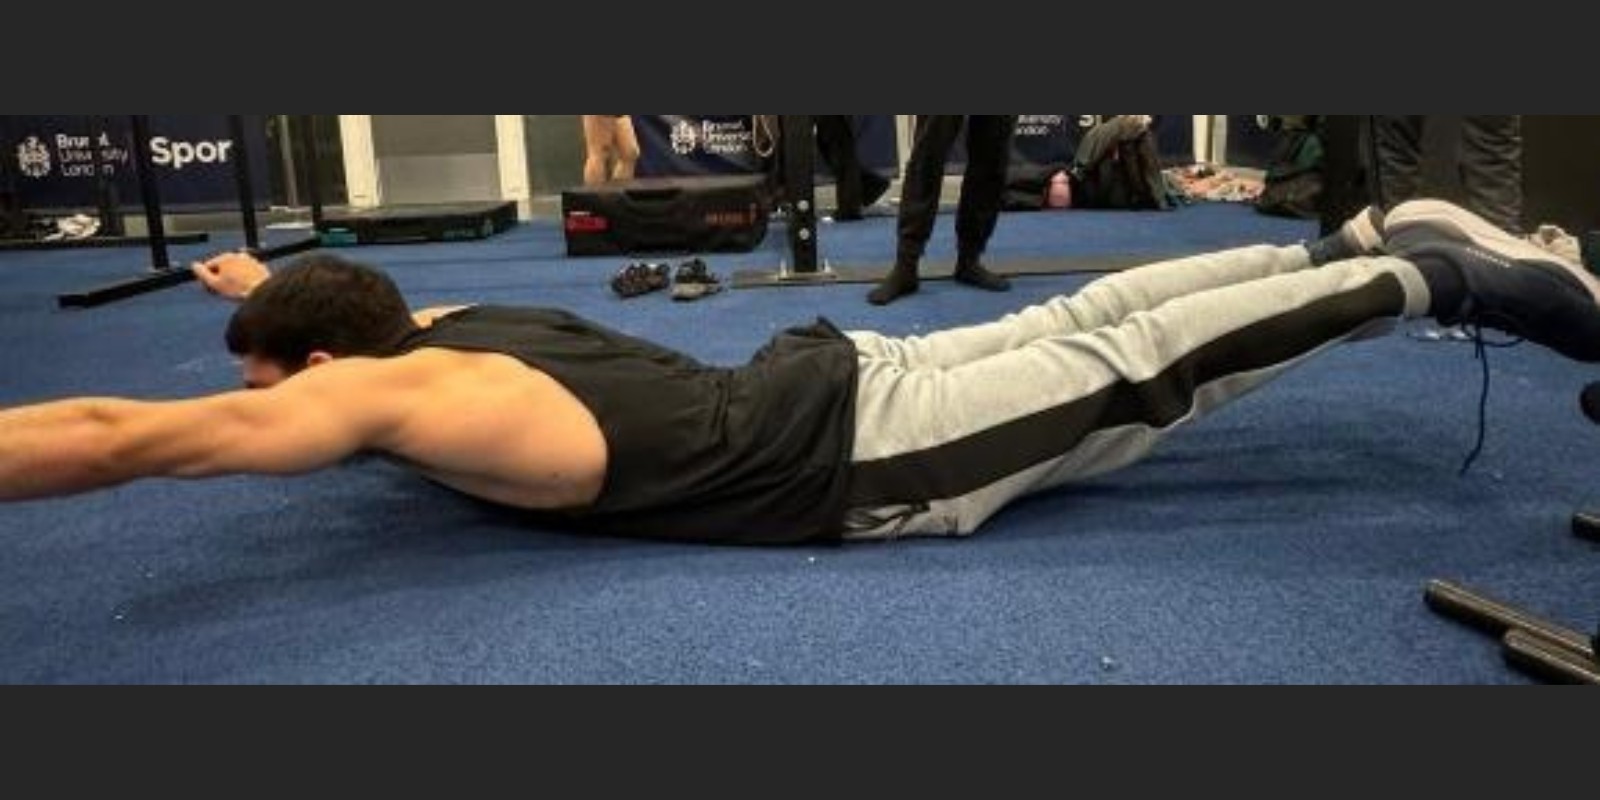
Figure 13 - Reverse Hollow body or Boat with proper execution
These should cover the fundamentals. How to progress in them? Increase the TUT to at least 60 seconds. Then you can think of adding weight on the hips for planks, or extremities for the hollow body (feet & hands).
Did you know there’s people with a 4-pack, 8-pack, 10-pack and even 12-pack? That all comes down to mainly genetics, however developing your abdominal muscles, and being lean also take their part to make them pop up and being seen.
Balance
Even as a beginner, starting to understand how you can use your hands to balance upside down is of good practice. Although, you may not know yet, but likely one day you will want to learn the handstand. And building the roots from early is going to be better in the long run.
To start with, Figure 14, the easiest to begin with is the frog stand [1]. Followed by the crow stand [2]. Headstand [3] (with 3 pillars – hands in front of you and not on your 1 v 2 v 3 v head), elbow-stand [4], elbow-lever (straddle, then full – some people find it easier on the parallettes than on the ground, build it up), and finally the handstand [5].
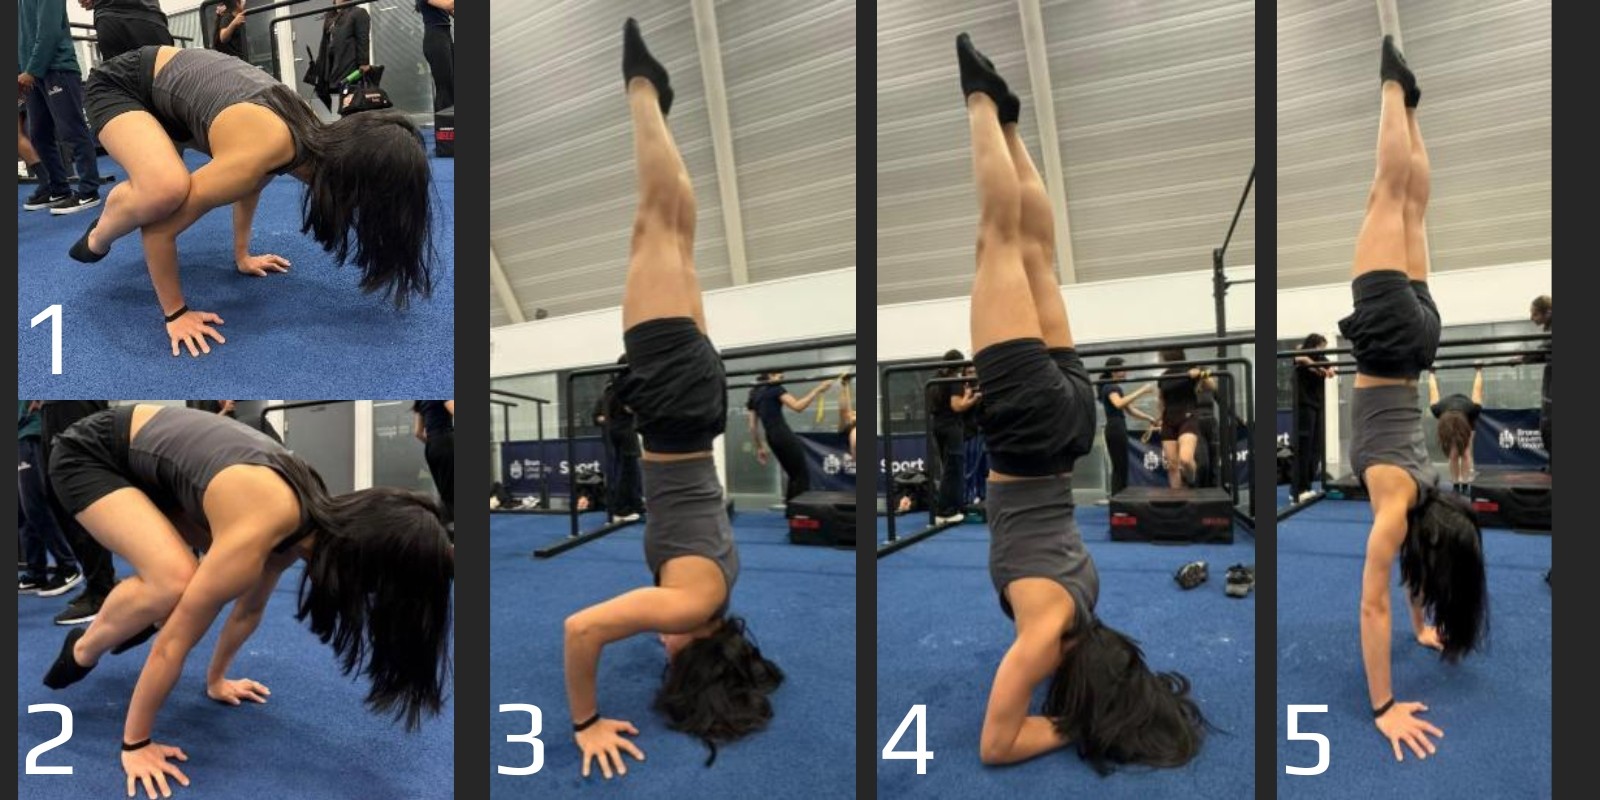
Figure 14 - Balancing progression examples
From here onwards, as your strength in your basics has grown, you can begin to make yourself walk up to the wall – take one foot off and tap the wall with the opposite foot to learn the balance. If still too hard, work your way up by simply having your feet on a higher level than your hands (like a box) and retain a pike position – just so part of your bodyweight is on your hands. And from there, is finding progressions and drills to the handstand. Always understanding the mechanics behind balance, body alignment, muscle engagement, leverage, pivot & balance points.
Once you feel prepared, I suggest going to a couple of sessions of actual handbalancers, circus instructors because they are the ones who know the most about it. Learn the drills, write them down, understand the principles behind them, and practice on your own. And then return back for feedback. That way, you will get the most out of it without spending too much.
5. Flexibility-Mobility
Do you feel stiff in certain positions? Do your wrists hurt? Want splits? A straighter handstand? Do you want to do more advanced elements? Do you want to touch your toes? All of these answers and more come down to flexibility-mobility training with strengthening on board.
It’s important to keep yourself to move freely in your daily life, and in your practice too. Not being able to execute a movement correctly or being restricted because of lacking the mobility is agonising. It sometimes can lead to injury as well (for example, poor mobility on the wrist when executing planche or handstands).
Thus, adopting a routine early on is of good practice. Personally, I put my flexibility/mobility routine as part of my warm-up. This way I ensure my body is opened (free of movement), warmed-up and ready to go. Of course, the routine varies depending on the day of training I am in – I am not always doing the same thing every time. But I have a cycle which I go through each week, ensuring I progressively overload and adjust according to how I feel on the day.
At the beginning, you can simply do the “follow-along” videos. Or contact a professional on the matter – contortionists are a good option (do your research – as they implement strength training on it). Eventually, once you understand the mechanics, the drills and proper execution, the lying fundamentals to the choices made in the programs, you can explore a bit more on your own.
Conclusion
All in all, this is not what you would have expected. Likely, you were simply waiting for a couple of exercises to follow and know of. However, I hope I managed to provide more than that. This is merely an introduction guide to the topics. I highly recommend you to research on them (if you haven’t already), and learn from there, explore, and have fun.
Enjoy the journey, lots of ups and downs, but very rewarding in the end.
About the Author
Simão began his Calisthenics journey in 2016 in Portugal, sparked by a childhood fascination with the Bar Brothers and fueled by recovery from a knee injury. Now based in London, he’s been coaching group sessions since 2018, helping others discover the power of bodyweight training. His approach blends experimentation, experience, and practicality—focusing on what truly works, not just what trends.
You can check out his coaching profile here
5 Essential Calisthenics Moves for Beginners
Start your calisthenics journey with this ultimate beginner’s guide—learn the five essential moves that build strength, control, and mobility to set you up for every skill ahead.
Simao Esteves
Introduction
As a beginner who either heard of Calisthenics online or through a friend, there are a couple of essential moves which mastered help laying the foundation for harder, more complex elements later on in the journey. These elements help building the foundation, which when strong and solid make everything a lot easier – avoiding injuries, stagnation, and frustration.
If we enumerate them, these would be: (1) progressive overload, (2) basics, (3) core, (4) balance, and (5) flexibility-mobility. Lucky for you (the reader), these are not only concepts to grasp, but also to understand, and explore throughout your entire journey.
In this short-manual, the intention is to open your horizons. Not to go too deep into each concept but to provide you with the essential information from which you can then research deeper.
So, let’s get into it!
Progressive Overload
If you are a “fitness guru”, you have most likely heard about progressive overload quite a bit and maybe you already know. However, if you do not, let’s dig into it.
What does it mean?
Progressive overload stands for a continuous process of development, challenge, tracking, awareness, rest, nutrition, and self-care. It’s the action of challenging your body in an exercise (or group of exercises) in a continuous manner (session to session, week-by-week, month-by-month) to grow stronger, faster, more skilled by raising the difficulty of the workouts and/or the exercises performed. Achieving your personal aims along the way, that you set at the beginning and conquering the goals to achieve those aims.
It’s a tool, which if used correctly, your progress is simply going to be “nuts”. This because, your body responds to stress. Give it a little, and it will change accordingly. Give it too much and it may break, or take too long to recover from. Knowing the correct quantity is the key – having someone to guide you who has previous experience is a short-cut (in general), but figuring it out on your own is also part of the journey (just listen to your body and make adjustments accordingly).
How to progressively overload?
The method has its rules, follow them and/or have a play, and progress is yours. These are:
1) Increase the number of sets.
2) Increase the number of repetitions [reps] or time-under-tension [TUT]. Whichever comes easier for you, and then increase the other one. They have an inverse relation. That means that when one increases, the other decreases. Managing this relationship correctly is what brings you good progress. One way for example, you began at 5 sets for 3 reps of pull ups. You increased to 5 sets for 5 reps, but cannot perform the 6th pull up. Now, you can build up TUT at the top/mid/bottom of the pull up on the last repetition. On the 5th rep of each set, you hold 3s at the top, mid and then bottom. Gradually increasing the hold duration to 5, 8, 10s and then the 6th pull up arrives. Another way of applying TUT is to focus on the weakest sections of the exercise and strengthen these ranges of motion [ROM].
3) Increase the difficulty by adding weight or changing progression, or decrease the assistance. Increments essentially, adding 0.25-5kg to the exercise or placing the elastic band in a different position (in terms of levers: from the feet to the knees, knees to below the butt, from below the butt to above the butt, from above the butt to a lighter band to eventually to no band) or going from a pull up to an explosive pull up, etc.
You start by modifying the number of sets, followed by the number of reps or TUT, and lastly, you modify the exercise difficulty (the progression). You should also be aware of the following chart:
Figure 1 - Strength, Hypertrophy, Endurance ranges Relationship
It clearly shows the relation between the ranges of Strength, Hypertrophy, and Endurance. As you can see, each range there is a cross-over. Meaning when working on strength ranges, you are getting hypertrophy too. When peaking the range for hypertrophy, strength development is reduced and endurance development is increased. Whereas on endurance ranges, little strength development happens as hypertrophy too. These are a guide; another concept is volume – the number of sets multiplied by the number of reps or TUT.
Peaks of each category: | Repetitions | Isometrics (time under-tension) | Notes: |
|---|---|---|---|
Power/Strength | 1-6RM | 0.5s – 5s | Muscle failure due to high load, high intensity (100-80%) |
Hypertrophy | 8-15RM | 10-30s | Moderate intensity (80-60%) |
Endurance | 20RM+ | 45s+ | Lower intensity (60- 20%) |
As you become stronger, what was once a 1 rep max [RM], it now becomes 3RM…5RM…10RM…etc, and increasing the load is necessary to keep good progress and avoid stagnation.
It’s of good practice to not always workout near your 1RM as it’s too taxing for the body, nor on 20RM+ either.
Having a balance between all ranges or at least 2 of them is of good practice to keep progressing.
Specifics come down to your aims & goals, training, sport, fitness level and athlete’s history. For example, a beginner’s workout is far different to an elite athlete – the first is yet learning the movement patterns, and the other is a veteran who already knows what works best for them.
Basics
These entail the fundamental elements of Calisthenics: rows & push ups, pull/chinups & dips, squats, and eventually skin-the-cats.
Rows & Push Ups
Horizontal movements which are the primary motions you must learn in Calisthenics (Figure 2 & Figure 3). Just like a mirror, each is an antagonist (counterpart) of the other element. They lay down the foundation for the next step – the pull/chin-up and dip.
Proper execution
Beginning with straight arms (elbows completely locked out), you bend the elbows while keeping the body straight (like a wood plank – feet, hips and chest/shoulders aligned) till you reach the floor or bar (or rings) with your chest. And do the reverse to complete the motion, that’s 1 rep.
Regarding the push up (Figure 2), you begin in a plank (pelvic tilt*) with scapula protraction*. As you go down (elbows bend [2]), you may lose this initial position (completely fine) however, once you complete the repetition and are at the top again, reset this scapula protraction [1]. Then, you can initialise the 2nd rep and any subsequent repetition.
*Pelvic tilt - highly important, do not stick your butt out nor let it loose and drop in (somewhere in the middle, there’s a hip rotation inwards). This pelvic tilt allows you to engage your core which is of utmost importance to keep stability in your lower back and spine, energy efficient, connection between your torso and lower limbs, control and safety of execution.
*Scapula protraction - imagine rounding your upper back, bringing your shoulders in front of the chest, and squeezing a pen between your chest. Keep the shoulders down (called “shoulder depression”) away from the ears.
Figure 2 - Push up with proper execution
Regarding the row (Figure 3), you begin in a reverse plank (likely at an angle initially and not with your body parallel to the ground) with scapula retraction*. As you go up (elbows bend), you retain this position throughout the entirety of the movement (contrary to the push up). Once you complete the repetition (chest to the bar/ring [2] and back to initial position with straight arms [1]), you can initialise the 2nd rep or any subsequent repetition.
*Scapula retraction – bring your shoulder blades together, as if squeezing a pen behind your back. Bring the shoulders down (away from the ears – maintains the shoulders inside their socket), and open the chest.
Figure 3 - Row with proper execution on rings
Pull/Chin-ups & Dips
Both these movements, may seem pretty straight forward. However, the form execution, speed, power between a beginner and pro are quite different.
On the one hand, the pro has mastered the movement; they know the ins and outs of it and how to be efficient with the execution to avoid sloppiness and keep them clean from start to finish (Figure 4 & Figure 5).
On the other hand, the beginner forgets to:
(1) lockout the arms at the bottom (pull ups) or top (dips);
(2) pull all the way up till their chin is over the bar and their collar bones are nearly levelled with the bar; whereas on the dips, bending their elbows past 90d. angle (shoulder just below elbow);
(3) maintain the body tight and rigid (“one unit”) without crossing the feet – just keeping them together;
(4) on the pull/chin-ups, the beginning of the motion begins through an active hang followed up by the bending of the arms;
(5) on the dips, the body never arches back on the way up despite fatigue – there’s a clear body alignment (chest, hips, knees, feet), even if the knees are bent backwards
Lastly, the difference between pull ups and chin-ups is just the hand grip. Chin-ups you execute the motion with the palm of your hands facing you (called “supination”), whereas on a pull up the back of your hand faces you (called “pronation”).
Below, Figure 4, you can see the key points of a properly executed pull up: [1] dead hang – initial position, usually used to rest; [2] active hang – first motion to initialise the pull, it can be kept for subsequent reps without having to go through [1] again; [3] midpoint of the pull; [4] top of the pull up – here a lot of people struggle to bring the chin over the bar, work on it separately if needed.
Figure 4 - Pull up with proper execution
In Figure 5, the beginning of the dip starts in [1] with shoulder depression and the body straight; as you bend the elbows and go down, you hit position in [2] where key points are that the shoulder is below the elbow (below 90d. bend) and the hips are under the bar. Then you return to position [1]. Regarding position [3], you can execute them if you have the mobility which allows you to do so – totally safe if such is developed progressively, simply gives you more room for gains due to the bigger pec stretch.
Figure 5 - Dip with proper execution
Squats
A simple bodyweight movement which most people may not be able to properly execute, at least not going all the way down without falling backwards. That is because they have tight ankles. How to fix that? Stretch your calves. Be able to get your knee past your toes, the further you can do that, the lower you can get without trouble. The misconception of your “knees past your toes is bad for you” has been debunked long ago.
Build to free weights, learn to bail if you get stuck under the weight, learn the front and back squat, deadlifts, pistol squats, and if you want to get adventurous, learn Olympic weightlifting where they will teach you the snatch and the clean & jerk. Learn proper execution and common mistakes. If you don’t have a good coach, I recommend looking into the professional Olympic weightlifter’s videos to get some cues on the execution of the movements (especially, Chinese athletes – they LIVE and BREATHE those movements). But as always, try to get some professional help initially (at least), it makes your life easier.
In Figure 6, are examples of calf stretches positions which you can work on in your warm-up prior to your leg session. Suggestions are to do between 60-90s each position [1], [2] and [3] once while actively pulling your toes towards you. Although, keep your 1 2 3 working foot on a height challenging enough to bring your heel to the ground as a measuring system – instead of a tall box just like in the figure. In position [4], it can be both used as progress measurement (how far can you bend your knee without lifting the heel off the ground) & stretching position.
Figure 6 - Calf stretches at 3 angles
Skin-the-Cats
These are a special addition to the mix. The only reason I decided to mention them is because they are the perfect introduction to straight arm movements and levers (Figure 7). Once you are able to do dips and pull ups, the skin-the-cats are the next best thing to practice.
In Figure 7, start in a hanging position – active hang; [1] tuck your knees to your chest (the closer to your chest the easier); [2] roll and elevate your hips – front-lever; [3] keep turning – upside down; [4] till your arms are behind your back – back-lever; [4] try to hit the German-hang position and from there go back to the beginning. Now, initially, a little help may be required to go over – a kick to build momentum, or someone spotting you.
Develop to maintain your elbows always locked out. Understand the movement, achieve full ROM. Increase the reps, and when strong enough (you will know), you can play with extending your knees further away from the chest to increase the difficulty (progressive overload remember?).
Figure 7 - Skin-the-Cat tuck version example of proper execution
Core
It’s not only about having a 6-pack. There’s far more to it. It’s your whole abdominal area – the front (abdominals, and diaphragm), the sides (obliques) and from behind (lower back, hips and glutes) and inside (the pelvic floor). To make things easy, these can be worked together (they usually are if with the correct activations & engagement) and in isolation – to an extent.
As you may know, your core is used for rotation, stability, flexion, and extension – not always necessarily doing one motion at a time, but sometimes doing a complex of them. Now, how to work on it? Doing exactly that. Now, I am not going to state every single exercise you can do, but I am going to mention those which I believe are the fundamentals to then develop every other from.
Essentials for Calisthenics:
Plank
The base of the base, any harder couldn’t be. It can be executed on your elbows or hands. Legs together with straight knees. You can protract your scapula or keep it neutral – just don’t let your chest sink in to the floor [in red]. Key components to look at: (1) the pelvic tilt – this is THE MOST IMPORTANT. It allows you to engage your core muscles correctly, protecting your lower back and spine from all the pressure from gravity. It also allows to keep your body straight and aligned when doing push ups and other pushing movement (Figure 2).
Figure 8 - Plank with proper execution
To understand the position correctly, stand-up with your back against the wall (Figure 9); bend your knees slightly; now, move your pelvis until your WHOLE lower back is touching the wall; keep it there, that’s your pelvic tilt. Make sure to really understand this motion, feel the muscles engaging.
Figure 9 - Pelvic tilt understanding on wall, drill
B. Reverse plank
The opposite to the plank (Figure 8), on elbows or on hands (elbows locked out, hands with fingers facing forward or fingers facing back or sideways, whichever you prefer). Open the chest, retract your shoulder blades (explained before in Rows & Push Ups), and push your hips ups – maintains the alignment (chest, hips, knees, feet). When done correctly, you should not be able to see your feet, only your chest and hips.
Figure 10 - Reverse plank with proper execution
C. Side Planks
Executed on one hand or elbow and leg or both legs if crossed. Make sure to push your hips high, keep the non-working arm resting alongside the body or straight up as in Figure 11.
Figure 11 - Side plank with proper execution
D. Hollow Body
Back to the ground & belly to the ceiling, your aim is to keep your shoulder blades (upper back) off the floor and feet, only the lower back should be touching the floor (pelvic tilt). Suck your stomach in, and bring your arms either to the side your body [2] (easier) or above your head [3] (harder). Initially, you may not be able to do it with complete straight legs, simply start with them at 90d. [1], increase TUT and progress accordingly till you have legs completely straight without losing your pelvic tilt at all times (even if your knees are bent).
E. Reverse hollow body position or “boat”
Belly and chest to the ground, lift your whole torso off the floor and legs, only your belly should be on the floor. Arms either alongside your body (easier) or above your head (shown - harder).
Figure 13 - Reverse Hollow body or Boat with proper execution
These should cover the fundamentals. How to progress in them? Increase the TUT to at least 60 seconds. Then you can think of adding weight on the hips for planks, or extremities for the hollow body (feet & hands).
Did you know there’s people with a 4-pack, 8-pack, 10-pack and even 12-pack? That all comes down to mainly genetics, however developing your abdominal muscles, and being lean also take their part to make them pop up and being seen.
Balance
Even as a beginner, starting to understand how you can use your hands to balance upside down is of good practice. Although, you may not know yet, but likely one day you will want to learn the handstand. And building the roots from early is going to be better in the long run.
To start with, Figure 14, the easiest to begin with is the frog stand [1]. Followed by the crow stand [2]. Headstand [3] (with 3 pillars – hands in front of you and not on your 1 v 2 v 3 v head), elbow-stand [4], elbow-lever (straddle, then full – some people find it easier on the parallettes than on the ground, build it up), and finally the handstand [5].
Figure 14 - Balancing progression examples
From here onwards, as your strength in your basics has grown, you can begin to make yourself walk up to the wall – take one foot off and tap the wall with the opposite foot to learn the balance. If still too hard, work your way up by simply having your feet on a higher level than your hands (like a box) and retain a pike position – just so part of your bodyweight is on your hands. And from there, is finding progressions and drills to the handstand. Always understanding the mechanics behind balance, body alignment, muscle engagement, leverage, pivot & balance points.
Once you feel prepared, I suggest going to a couple of sessions of actual handbalancers, circus instructors because they are the ones who know the most about it. Learn the drills, write them down, understand the principles behind them, and practice on your own. And then return back for feedback. That way, you will get the most out of it without spending too much.
5. Flexibility-Mobility
Do you feel stiff in certain positions? Do your wrists hurt? Want splits? A straighter handstand? Do you want to do more advanced elements? Do you want to touch your toes? All of these answers and more come down to flexibility-mobility training with strengthening on board.
It’s important to keep yourself to move freely in your daily life, and in your practice too. Not being able to execute a movement correctly or being restricted because of lacking the mobility is agonising. It sometimes can lead to injury as well (for example, poor mobility on the wrist when executing planche or handstands).
Thus, adopting a routine early on is of good practice. Personally, I put my flexibility/mobility routine as part of my warm-up. This way I ensure my body is opened (free of movement), warmed-up and ready to go. Of course, the routine varies depending on the day of training I am in – I am not always doing the same thing every time. But I have a cycle which I go through each week, ensuring I progressively overload and adjust according to how I feel on the day.
At the beginning, you can simply do the “follow-along” videos. Or contact a professional on the matter – contortionists are a good option (do your research – as they implement strength training on it). Eventually, once you understand the mechanics, the drills and proper execution, the lying fundamentals to the choices made in the programs, you can explore a bit more on your own.
Conclusion
All in all, this is not what you would have expected. Likely, you were simply waiting for a couple of exercises to follow and know of. However, I hope I managed to provide more than that. This is merely an introduction guide to the topics. I highly recommend you to research on them (if you haven’t already), and learn from there, explore, and have fun.
Enjoy the journey, lots of ups and downs, but very rewarding in the end.
About the Author
Simão began his Calisthenics journey in 2016 in Portugal, sparked by a childhood fascination with the Bar Brothers and fueled by recovery from a knee injury. Now based in London, he’s been coaching group sessions since 2018, helping others discover the power of bodyweight training. His approach blends experimentation, experience, and practicality—focusing on what truly works, not just what trends.
You can check out his coaching profile here
© 2026 UKCO
© 2026 UKCO
© 2026 UKCO